
23 Ormond Road East Geelong 03 52221449
Tuesday, December 8, 2015

Saturday, December 5, 2015
Christmas In A Jar
Show
Topper Ideas for Mason Jar decorative lids by Cosmo Cricket
I
popped into the store a couple of weeks ago to find Marisa admiring her cool Cosmo
Cricket Show Topper Lids that go with any wide mouth mason jar that are
everywhere online at this time of year such as cookies in a jar, snow globes in a jar
and so much more.
Wondering how to use and decorate the lids other than a traditional photo holder/name tag lid Marisa asked me to see what I could do. They come in 2 vintage colours, green and white and 2 designs, a knob and a label/photo holder.

So my big question was how can we decorate the lids so that they aren’t permanent?, I want to give the jar as a gift for a specific occasion and then have the recipient be able to use the jar for any other purpose.
I
came up with 3 designs so far (plenty of
more in my head)
One
big issue I had to start was how to cover the base without sticking any paper
down.
We
soon discovered you could unscrew the Photo clip rather than cut around it and
place the magnetic base under the clip which is much easier and neater.
We thought we would share some of our ideas with you in case you need some inspiration for gift giving this year. So here goes….
Christmas Tree Oh Christmas Tree : Love
love this idea, an ode to gift giving..

10. Cut 3 different size squares (x2) and decorate with fine ribbon then using foam tape attach to the rectangle magnets.


G’day Crafters, Belinda
here and I am a guest contributor to the “Create On Ormond”
Blog.
Wondering how to use and decorate the lids other than a traditional photo holder/name tag lid Marisa asked me to see what I could do. They come in 2 vintage colours, green and white and 2 designs, a knob and a label/photo holder.

So my big question was how can we decorate the lids so that they aren’t permanent?, I want to give the jar as a gift for a specific occasion and then have the recipient be able to use the jar for any other purpose.
My
first solution was to use flat magnets on the lids as they are made out of
metal and this way I could stick the paper to the magnet making the base removable
yet sturdy.
(Christmas tree & Star burst
designs)We thought we would share some of our ideas with you in case you need some inspiration for gift giving this year. So here goes….

1. To create you tree template
simply take some scrap card stock about 6 x 6 inches and fold in half. Draw
half your tree then cut out and unfold. The size is up to you my tree was about 4"
2. Use the tree template and
draw & cut out on your tree onto green cardstock (x 2)
3. Cut out a base in brown
cardstock to insert into the trunk of the tree to make it sturdier (x 2)
4. Cut small stars out of
cardstock ( sizzix nesting star smallest) x 2
5. Using some jewellery or
florist wire make a flat coil or a u shape at both ends add a ½” glue dot to your stars and glue them together
with the wire coil in the middle
6. Put a glue dot on the base
of the star wire and glue both tree shapes together then glue the base of the
tree on both sides.
7. Decorate the tree with
pretty gem stickers and pearls etc
8. Using the 2nd largest
sizzix circle die cut your magnet or base card
9. Cut one inch rectangles (x2)
from your magnet sheet as well these are for the presents.
10. Cut 3 different size squares (x2) and decorate with fine ribbon then using foam tape attach to the rectangle magnets.
Tools& supplies used : Sizzix nesting stars 657567, Spellbinders nestablities standard circles S4-114, Die Cutting Machine, Glossy accents, Glitter Glue, Glue Dots ½”, Scissors, Distress ink vintage photos, inking tool, green/brown card stock, decorative papers beading wire, glue, gem stickers, fine ribbon…..
Star Burst design

1 Cut out 2 large stars, 2 medium stars, 4 small and 14 extra small stars out of chosen cardstock.
2. Cut 5 pieces of wire about 3 inches
length and 1 piece of wire about 7 inches
3. Coil or fold both ends of the wire to
help secure to the stars
4. Use glue dots on both sides of the
wire to stick the stars together this will give you the sprays busting out of
the main star. Glue stars to both ends of the 7 inch wire.
5. Using glue dots place all 5 stars wire
ends inside the biggest star and glue the 2nd star to cover, now glue the 2nd
largest star on either side of the large one.
6. Using the second largest sizzix circle
cut your base (gold card stock ) and glue a half small star either side of the
lid to decorate
7.
Tie
a bow of sheer ribbon and twist the longer star wire around the clip to
decorate
Tools& supplies used : Sizzix nesting stars, sizzix circle 2nd largest, glue dots, gold card stock, glittery vintage gold card stock, beading wire, flat magnet, scissors, glue, sheer ribbon
Shabby Chic Frame design


1. Cut your card x1 and decorative paper
x2 using sizzix labels 8 the largest (6) and 3rd largest (4th) dies.
2. Cut 2 stars (2nd die) and 2 stars (3rd
die)
3. Cut 1 large kaisercraft Doily out of pattern paper
4. Thread beads and crystal on fishing
line, punch a small hole into card stock scrap and tie the beads to this. This is glued to the
middle of your large star. Glue both large stars together and then glue your
smaller stars either side.
5. Punch a small hole in the top of your
card stock (the middle of your frame) this will be covered with your decorative
paper to tie the fishing line to.
6. Glue your decorative paper frames on
both sides of the card.
7. Decorate your frames as you wish, I used old rub on gold stickers.
8. Edge your frames, stars and doilies
with distress ink : vintage photos
9. Unscrew the photo clip and place
your doilie or card on the base and make the centre point. make a small hole for
the screw then replace the clamp.
10. Tie a beautiful bow around the clamp
and tie the gift tag to the jar
Tools& supplies used : sizzix star 657567, spellbinders nesting : labels eight S5-019, Kaisercraft :decorative doilie die DD504 (large), glitter glue, glossy accents, distressed ink : vintage photo, Glue dots, 4 glass crystal beads, 6 small pearly beads, 3 metal flower accents, clear fishing line, Sheer ribbon, twine, Decorative paper, gold card stock, white card stock.
If you like these ideas Create On Ormond is holding a Christmas in Jar workshop on Tuesday 15th December at 10.00am.
Cost is $10.00 and this includes 1 lid of your choice. Kits available on the day. You are welcome to use your own paper, embellishments etc.
To book call the shop on 52221449 and speak with Marisa
Thursday, December 3, 2015
Christmas Holiday Closure Dates
This year the shop will be closed from Monday 21st December until Monday 28th December.
We will open Tuesday 29th, 30th and 31st from 9.00 to 3.00 and then return to normal trading on Monday the 4th of January 2016...
We would like to wish you all a happy & safe holiday season and we look forward to a bright and creative year ahead.
Create On Ormond
Thank You Fiona & Dot
Better late than never so the saying goes......we recently held 2 scrapbooking workshops run by the very talented and effervescent Fiona Paltridge......... both sessions were extremely successful and lots of fun. We would like to thank all of you who attended these classes, Deena for your impromptu teaching assistant role and especially Fiona for travelling from Mount Gambier and sharing your love and passion of scrapbooking with all of us.....
can't wait to see the next Class!!! Here are a few pics of some of the gals in action.....


We also would like to thank Dot Lethbridge for travelling to Geelong from Portland recently to teach 2 wonderfully informative card workshops, ..........thanks to those who attended I know you loved Dots work and would love to see her return next year with some more card techniques.....


Thursday, October 8, 2015
Term 4 Kids Club
Creative Kids After School Classes
Starting in term 4, Create On Ormond is running Creative Kids after school classes. Your child will learn new skills, create great projects to take home and most of all have FUN doing it! The classes are run each Tuesday after school from 4.00 - 4.10 until 5.30pm by Kristy Milward a fully qualified primary school art teacher. Kristy has designed 3 amazing projects for the kids this term and she is all about working with the children to develop their own styles and interests...
the projects include an art journal, art canvas and a Christmas project with loads of techniques and products involved.
To be part of the fun book your child's seat now.....all school aged children welcome....
Classes cost $25.00 each or pay up front for all 6 classes and pay only $120.00 (save $30)....
Limited seats available so be quick. Call Marisa on 52221449 or 0409228949
New Art Journal Classes
Let's create whimsical and beautiful inspirational pages in this 4 - week tutorial on Creative Journal Making. You will work with exciting materials, learn to manipulate them and create fun and enjoyable designs and fonts. You will learn about backgrounds, drawing tools and colour theory all taught the easy way. Come along on this wonderful journey of colour, texture and design and Let's make a beautiful Art Journal!.......Saabira
2 Group Sessions: Tuesdays & Saturdays
Start Dates: Tuesday 13th 10.00am to 1.00pm
Saturday 17th 10.00am to 1.00pm
Cost: $40 per session...total $160........
Please bring and Art Journal, black fine liner and white paint pen......we have them in store for you to buy if required......
 |
| Artwork by Saabira Razac |
Call Marisa 52221449 for more details and to book.
Wednesday, September 9, 2015
Fiona Paltridge Scrapbooking Classes
bookings and pre - payment is essential......52221449
“When Earth
Meets Sky”
Photo 3”x4”
portrait (approximately)
Sunday Morning 9.00 to 12.00
November 8th
Cost $40
 Materials in kit:
Tissue paper
Corrugated
cardboard
Cheese cloth
5”x3” rectangle
Twine
 Leaf
Leaf
Medium sized
doily
Book page
Bead
collection
12 x12 white
card
Materials to share:
Prima Bloom
Sprays “Gilded”, “Soft Teal”, “Summer Sky”
White gesso
Gel medium
matte
Dylusions
Ink Spray “Ground Coffee”
Black splash
ink
Prima clear
stamp “Messy”
Fan Brush
Small water spray bottle
Fan Brush
Small water spray bottle
Participants to bring:
Gesso brush
SatzOn Ink black Archival Black Ink
Gathered Twigs distress ink
Blending Tool for distress inks
Heat GunGathered Twigs distress ink
Blending Tool for distress inks
Glue (tombow acqua or multi, strong tacky glue)
“If Friends
Were Flowers” or “Best Friends”
Photo 3”x4”
landscape (approximately)
When: 12.30 to 3.30
Sunday 8th November
Cost: $40
Note: This class is offered as either a masculine background (Best Friends) or feminine ( If Friends Were Flowers) .....Sneak Peaks are from If Friends Were Flowers...
Materials in kit:
A5 white card stock
A5 white card stock
A5 black
card stock
Cheese cloth
5”x3” rectangle
Memory Box “Pennington
Rose” x 2 or Tim Holtz Alterations “Gadget Gears” x 2 full sets
Black cotton
12 x12 water
colour paper
Printed
quote

Piece of
cardboard box
Materials to share:
Prima Bloom
Sprays “Soft Teal” or “Gilded” and “Sunshine”
White gesso
Modelling
paste
Black splash
ink
Indigoblu
Dinkie Stamp “Poppy” or Stampendous “Steampunk Gears”
Grid stamp
Mesh tape
Prima 12x12
“Checker” stencil
Black Marble Dylusions spray
Black Marble Dylusions spray
Participants to bring:
Black
Distress Ink and
blending tool
Staz On Ink
Foam Tape
Scissors
Palette Knife
Glue Strong wet glueHeat Gun

Tuesday, August 25, 2015

We are thrilled to have Dot come up from Portland to share her mixed media knowledge with you. She will be here on the weekend of October 10th and 11th....Dot was recently published in the Australian Simply Cards and Craft Stamper Magazines...
One Stamp 3 Ways
Saturday October 10th
2.00 to 5.00pm
Cost $45.00 includes kit and class
Please read the ‘what to bring’ list for each class so that you get the most out of the day.
What
To Bring:
Basic
Tool List
- Non–stick craft mat
- Mister bottle
- Paper towel
- Fine paint brush
- Fine liner
- Ink blending tool
- White gel pen
- Double sided tape
Shared
Products To Bring If You Have Them:
- Archival ink – jet black
- Distress inks – black soot, mowed lawn, mustard seed
- Dylusions sprays – fresh lime, lemon zest
- Sharpie white water-based paint pen


"Magical Christmas Backgrounds"
Sunday October 11th
Time: 10.00 to 1.00pm
Cost $45 includes kit and class
Sunday October 11th
Time: 10.00 to 1.00pm
Cost $45 includes kit and class
What
to Bring:
Basic Tool Items
- Ink blending tools
- Non-stick craft mat
- Mister bottle
- Paper towel
- Sharpie white water- based paint
- Black fine liner
- Scissors (it’s always
nice to use your own)
- Bone scorer
- Double sided tape
Shared
Products To Bring If You Have Them:
- Archival ink – jet black
- Distress inks – forest moss, peeled paint, mustard seed,
peacock feathers, wild honey
- Distress re-inker – mustard seed
- Dylusions paint – black, white
- Dylusions sprays – lemon zest, fresh lime, cut grass
- Circle stencil

NOTE DISCOUNT : Book in for both sessions for $80.00 (SAVE $10)
To book contact the shop on 52221449
Thursday, July 23, 2015
Heartfelt Creations
Heartfelt Creations make beautiful stamps, dies and co-ordinating paper pads. We were lucky enough to have Joan McAlpine leave a few of her cards in at the shop this week and hopefully we can persuade her to teach one of these in a heartfelt creations card class....here are two of her cards one card is using the Fuschia collection and the other the more masculine co collection "All geared up" what do you think?


Joan also created this amazing piece for your wall, she has used Heartfelt Creations dies and stamps to create these amazing flowers, they actually started out as white paper! You should see them in person as they really pop out at you and the colours are really vivid. Joan is teaching this class on September 12th, 10.30 to 1.30.......Cost $45.00 please call the shop to book on 52221449. Payment required on booking thankyou.


Monday, July 13, 2015
Creative Kids After School Classes
Starting in term 3, Create On Ormond is running Creative Kids after school classes. Your child will learn new skills, create great projects to take home and most of all have FUN doing it!
The classes are run each Tuesday after school from 4.00 - 4.10 until 5.30pm by Kristy Milward a fully qualified primary school art teacher. Kristy has designed 3 amazing projects for the kids this term and she is all about working with the children to develop their own styles and interests...
the projects include an art journal, art canvas and creative cards with loads of techniques and products involved.
To be part of the fun book your child's seat now.....all school aged children welcome....
Classes cost $25.00 each or pay up front for all 6 classes and pay only $120.00 (save $30).....
Please note the classes do not include all class materials..... a class kit is available on your first visit for a one off fee of $20.00. This includes your journal, canvas and art supplies.....
Limited seats available so be quick. Call Marisa on 52221449 or 0409228949


Thursday, June 4, 2015
NEW WALL ART CLASS
Be inspired with this timeless wall art class. We will create a beautiful piece of artwork ready to be displayed in an 11 x 14 frame and lend themselves to all photographic styles. Not only will you create this piece of artwork, but we will walk you through each stage of the process of creating timeless pieces of wall art and the techniques involved.
Class includes: Marion Smith papers, Prima Papers, Prima embellishments, foam core, backing fabric, prima flowers.

Students bring: Basic tool kit ( paper trimmer, scissors, double sided tape, ruler.) a Crop-o-dile or 1/8” hole punch, black sharpie marker, a roll of foam mounting tape, distress ink and applicator. Photos can be added to this project at home.
WHEN: Saturday 8th August 9.30-11.30
E: info@createonormond.com.au
P: 52221449
Skill level: Intermediate to advanced
Limited kits available
Class cost: $45
December Daily Mini Album
NEW MINI ALBUM CLASS


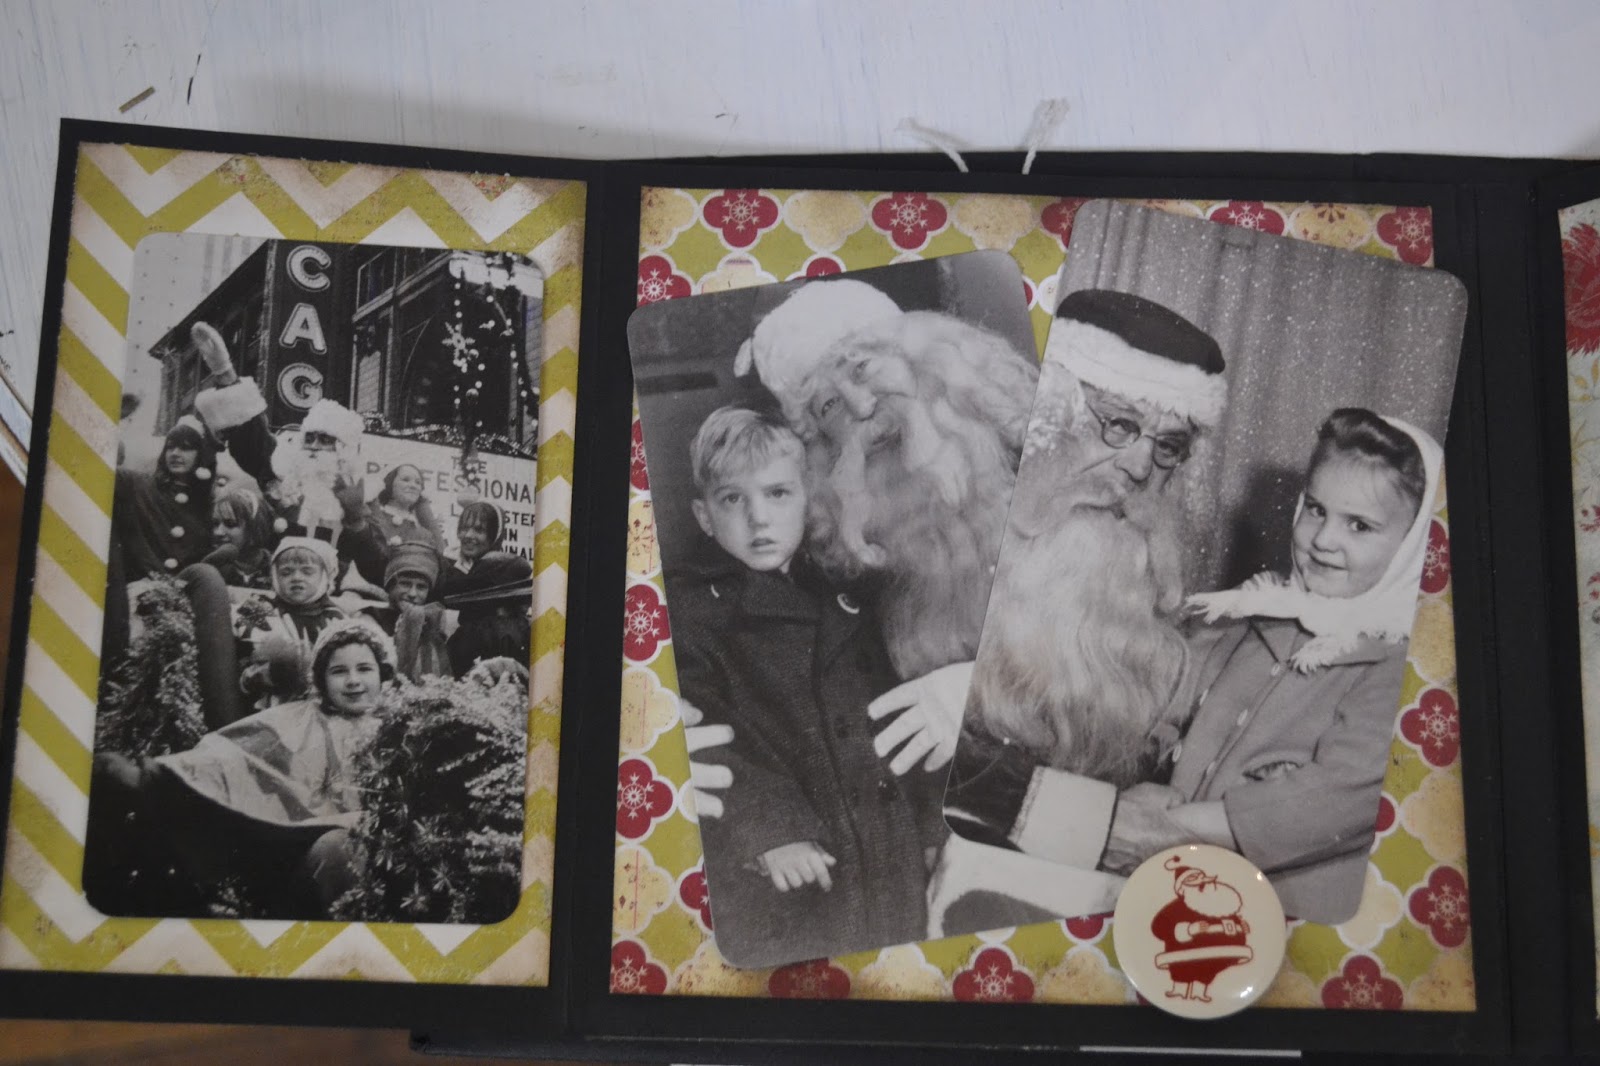


NEW CLASS
We have a date for the December Daily Mini Album that has been in the shop on display.
The class will show you how to make this album from scratch and make it wide enough to suit the 25 days in December. The perfect mini album for all those Christmas photos.....
Each page has a pull out section that fits 4 cards, so 6 pages and 4 pull outs each gives you 24 days, the 25th day is displayed as a waterfall of photos because you are bound to have more photos on this day.
I hope you can join us on SATURDAY 25th JULY........to make this album. Limited kits available.
The class will run from 9.30 until 2.00 and in this time you will get the construction of your album completed and depending on your speed whether you get all the embellishing done...
The class includes your kit and class for $85.00......this includes all materials.
You will need to bring with you the following:
Tombow acqua glue, Scor Tool, Scissors, Ruler, dble sided tape, paper trimmer Distress Ink & lunch......
Kaz' McGlynne holds an Illustration art class on the 3rd Friday and Saturday of the month at Create On Ormond
Her Illustration class this month is all about ZENTANGLEs.....
The Zentangle Method is an easy-to-learn, relaxing, and fun way to create beautiful images by drawing structured patterns.
In this one day workshop you will discover the art of Zentangle and create an illustration using stamps and and your tangles..
BYO: Lunch

Her Illustration class this month is all about ZENTANGLEs.....
The Zentangle Method is an easy-to-learn, relaxing, and fun way to create beautiful images by drawing structured patterns.
In this one day workshop you will discover the art of Zentangle and create an illustration using stamps and and your tangles..
 |
| Image is from Blendspace |
When: June 20th
Time: 10.00 to 3.00
Cost: $65.00 includes your class and kitBYO: Lunch
Limited spaces available please call to book. 52221449
 |
| Photos are from the Zentangle web site for your inspiraton |
Subscribe to:
Posts (Atom)